

How to Clean Commercial Deep Fat Fryers Safely and Effectively
What if the fastest way to clean a fryer is also the way most likely to leave stubborn residue behind? Carbonised grease can resist a quick wipe, while rushing a boil-out or choosing an unsuitable chemical can create safety and equipment risks. Knowing how to clean commercial deep fat fryers means controlling each step, not simply scrubbing harder.
A thorough clean need not mean unnecessary downtime or exposing staff to hot oil, splashes or unsuitable chemicals. The right method depends on the fryer manufacturer’s instructions, the type and amount of build-up, and the cleaning product’s directions. Never assume a general-purpose degreaser is suitable for a fryer interior.
This guide covers the process, from shutting down and draining the fryer safely to removing residue, rinsing, drying and inspecting it before use. It also explains when a boil-out may be appropriate and how to establish a repeatable cleaning routine. The aim is a cleaner fryer, good food hygiene practice and fewer avoidable equipment problems.
Key Takeaways
- Match the cleaning method to the residue: loose food particles, oil film and carbonised deposits need different attention.
- Learn how to clean commercial deep fat fryers using a method guided by the fryer manual and cleaning-product label.
- Compare routine cleaning, manual interior cleaning and manufacturer-approved boil-outs to understand when each may be appropriate.
- Inspect the fryer after cleaning for visible residue, cleaner traces, moisture and components that may not be correctly refitted.
- Choose kitchen cleaning supplies for their stated use, surface compatibility and label instructions.
Why regular commercial deep fat fryer cleaning matters
Fryer cleaning supports more than a tidy kitchen. It helps maintain food hygiene, protect food quality and keep equipment in dependable working condition. Crumbs and old deposits can affect the flavour, colour and consistency of fried food, while accumulated grease takes longer to remove and can complicate routine maintenance.
Residue varies, too. Loose crumbs, a greasy oil film and hardened carbon deposits are different cleaning problems. Recognising which one you are dealing with helps staff choose a suitable method instead of using unnecessary force or an unsuitable chemical. This Deep fryer cleaning reference provides a general overview of fryer design and cleaning considerations.
What builds up inside a commercial fryer?
During service, food particles fall into the oil and settle on the base, sides or other accessible surfaces. Oil can leave a slippery film above the oil line and around components. If residue remains and is repeatedly exposed to heat, it may harden into dark, carbonised deposits that cling firmly to surfaces.
Each type of residue calls for a different response. Loose debris can often be removed without aggressive scrubbing; oily film needs a compatible cleaning method; baked-on carbon may require a deeper process approved for the equipment. Deposits left in place can break loose, mark food or contribute stale flavours. They can also make the next clean more labour-intensive.
When should a fryer be cleaned?
There is no single interval that suits every fryer. Cleaning needs depend on service hours, menu and cooking volume, the amount of debris produced, and the manufacturer’s instructions. A fryer used heavily for crumb-coated foods may soil faster than one used for foods that produce less residue.
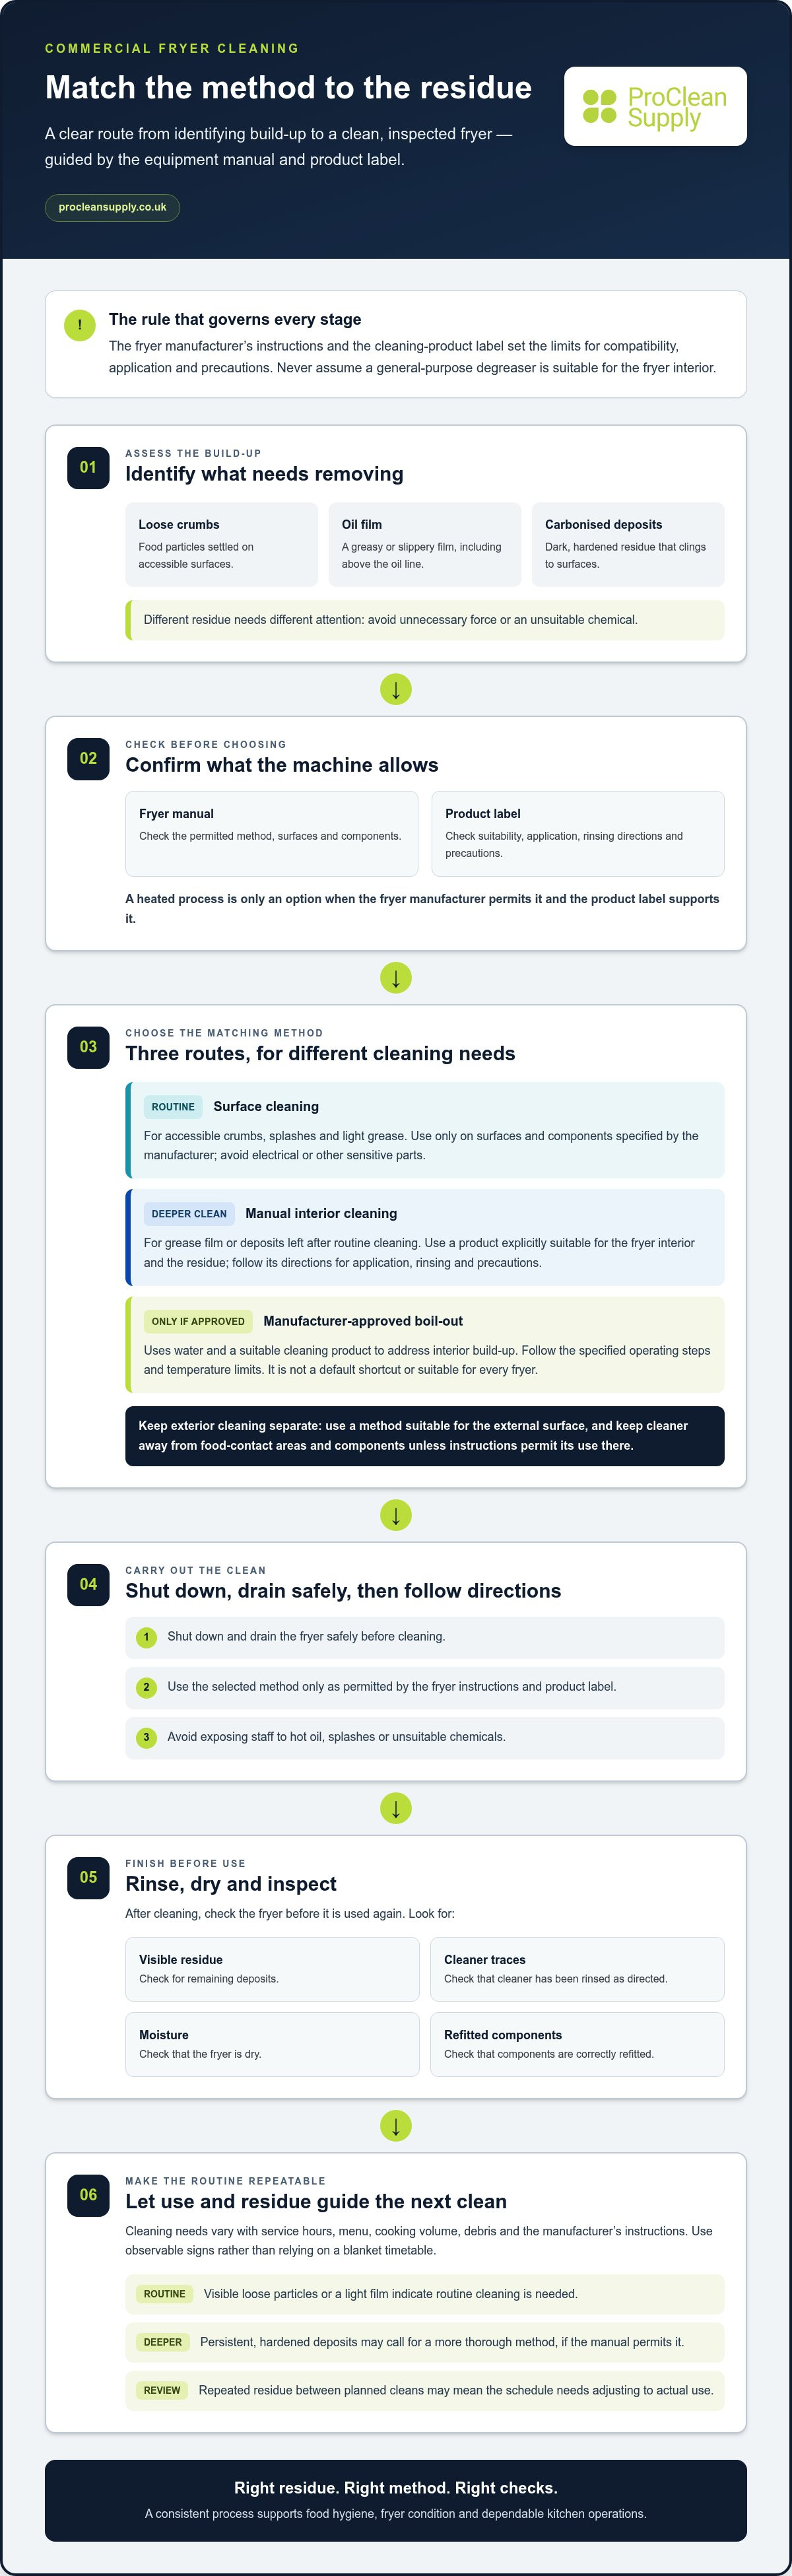
Plan for two levels of attention: routine cleaning to manage visible debris and oil film, and a deeper clean or boil-out when build-up warrants it and the fryer instructions permit it. A boil-out is not a default shortcut. Follow the equipment manual and cleaning-product label for the method, compatibility and precautions.
Use observable signs to decide what the next clean needs to address. Look for crumbs collecting in accessible areas, a persistent greasy film, dark deposits that remain after routine cleaning, or residue affecting the appearance or flavour of food. Record recurring issues in the kitchen cleaning schedule, then adjust the plan to actual use rather than relying on a blanket timetable.
- Routine attention: Visible loose particles or a light film indicate that routine cleaning is needed.
- Deeper attention: Persistent, hardened deposits may call for a more thorough method, provided the manual permits it.
- Review: Repeated residue between planned cleans may mean the schedule needs adjusting to match usage.
For teams learning how to clean commercial deep fat fryers, the practical aim is to match the method to the residue and the machine. A suitable cleaning routine helps protect fryer condition while supporting consistent food-service operations.
Commercial fryer cleaning methods: routine cleaning, degreasing and boil-outs
Choose a method according to the residue, fryer design and task. A light oil film does not need the same treatment as baked-on carbon, and a product suited to an exterior surface may not be suitable inside the fryer. For commercial equipment, the manufacturer’s instructions and cleaning-product label set the limits. They determine chemical choice, application and whether any heating process is permitted.
Routine cleaning versus a deeper fryer clean
Routine cleaning removes accessible food debris and grease before they become harder to shift. A deeper clean may be needed when deposits persist or build up on the interior. Treat exterior cleaning as a separate task: use a method suitable for the external surface, and keep cleaner away from the food-contact area and fryer components unless the instructions permit its use there. The FDA food safety guidelines discuss safe food handling and cleaning; UK kitchens should also follow their own food-safety procedures and equipment guidance.
The table compares the purpose of each method. It is not a substitute for checking compatibility: use a method only when the fryer instructions and product label support it.
| Method | Purpose and residue | Suitability and precautions |
|---|---|---|
| Routine surface cleaning | Removes accessible crumbs, splashes and light grease from surfaces. | Use only on surfaces and components specified by the manufacturer. Avoid electrical or other sensitive parts; follow product directions and required protective measures. |
| Manual interior cleaning | Targets grease film and deposits that routine cleaning has not removed. | Use a product explicitly suitable for the fryer’s interior and the type of residue. Follow the label for application, rinsing and precautions; do not assume a general kitchen degreaser is appropriate. |
| Manufacturer-approved boil-out | Uses water and a suitable cleaning product to address interior build-up. | Use only if the fryer manufacturer permits the process and the product label supports it. Follow specified operating steps and temperature limits; heating an unsuitable chemical or fryer can create a hazard. |
When is a boil-out appropriate?
A boil-out uses water and a suitable cleaning product in the fryer. It is not a universal solution for every model or type of deposit. Check the manual and product directions first, including whether the process is approved, how the product should be used and what precautions apply. If either source rules it out, use an approved alternative.
Do not transfer domestic soap-and-water boil-out advice to commercial equipment without explicit approval. Commercial fryers vary in design and operating requirements, so household products and methods may not be compatible. For staff learning how to clean commercial deep fat fryers, the key is to distinguish routine surface work from interior treatment and use only methods authorised for that equipment and task.
For other kitchen tasks, explore professional catering and hospitality cleaning supplies, choosing products according to their stated use rather than assuming they are suitable for fryer interiors.
How to clean a commercial deep fat fryer step by step
Use this sequence as a framework, not a replacement for the fryer manual or cleaning-product label. Their instructions take precedence, including cooling requirements, permitted cleaning methods and restart procedures. Before starting, consult the workplace risk assessment and product safety information. Set up a controlled work area, keep other staff clear and wear the specified personal protective equipment (PPE).
- Prepare the work area. Schedule the clean for a time when the fryer can be taken out of service. Put suitable containers and cleaning materials within reach, and deal with nearby slip and trip hazards. Keep food and food-contact items away from the work area. Follow workplace procedures for chemical handling and used-oil disposal.
- Stop and isolate the fryer. Switch it off and isolate its energy supply as directed by the manufacturer and site procedure. Tell staff that it is being cleaned and make sure it cannot accidentally restart during the task.
- Allow the fryer to cool. Wait until it reaches the safe condition specified by the manufacturer before draining or cleaning. Never add water to hot oil. Contact between water and hot oil can cause dangerous splashing.
- Remove the oil safely. Follow the fryer’s draining procedure and use appropriate, stable containers. Take care around residual heat and avoid splashing or overfilling. Do not pour oil into a sink or drain; handle it under your kitchen’s waste procedures.
- Remove accessible food debris. Once the fryer is safe to work on, clear loose crumbs and deposits using the method and tools permitted by the manual. Avoid damaging surfaces or components. Keep debris out of drains and dispose of it in line with workplace procedures.
- Clean the interior with a suitable method. Use only a product labelled for the intended fryer surface and cleaning method. Follow its dilution, application and contact-time directions, if provided, as well as the required PPE and precautions. Do not assume a general kitchen degreaser is suitable for the fryer interior. Never heat a cleaning solution unless the fryer instructions and product label explicitly permit it.
- Rinse as directed, then dry fully. Rinse food-contact surfaces only in the manner specified by the manufacturer and product label, removing cleaner residues. Keep water away from components that must not get wet. Dry the fryer thoroughly with suitable materials before refitting parts or adding oil.
- Check before return to service. Confirm the fryer is clean, dry and correctly reassembled, with no visible cleaner residue. Refill and restart only as instructed by the manufacturer. Check that components are secure and the fryer operates as expected before preparing food.
For staff learning how to clean commercial deep fat fryers, consistency comes from following the same authorised sequence and recording any defects or cleaning issues for the responsible person. If the manual or product instructions do not support the intended method, stop and select an approved approach before proceeding.
After cleaning: inspect the fryer and prevent residue returning
Cleaning is complete only when the fryer has passed a separate inspection. A surface can look clean at a glance but still hold cleaner traces, moisture or deposits in less visible areas. Carry out a consistent check before returning the equipment to service, and record anything that needs attention.
What to check before the fryer is used again
Inspect accessible food-contact surfaces under good lighting. Look for remaining grease, crumbs, carbon deposits, cleaning-product traces or standing water. Check corners and joins where residue or moisture can collect. If the product instructions specify a rinse or other verification step, follow it rather than relying on appearance alone.
Check removable items, including baskets and guards, separately. Confirm they are clean, dry and correctly refitted. Look for damage, unusual wear or loose components on accessible surfaces. Use the fryer manual for restart checks. If you find a fault or damaged part, do not bypass it or put the fryer back into service; report it through the kitchen’s maintenance process.
Build a practical fryer-cleaning routine
Set task frequency around actual use, visible condition, manufacturer advice and site procedures, rather than applying one timetable to every fryer. A unit used for long services or foods that shed more crumbs may need closer monitoring than a lightly used fryer. Review the schedule if checks repeatedly find build-up before the next planned clean.
Make responsibilities clear. A simple record helps the team track completion, recurring residue and faults without duplicating the cleaning procedure. Include:
- Completion: Date, fryer identification and staff member responsible.
- Condition: Residue found, areas requiring extra attention and any cleaning-product concerns.
- Maintenance: Damage, loose or missing components, faults reported and the person notified.
Keep oil management separate from equipment cleaning. Filtration, oil changes and fryer cleaning are distinct tasks with different purposes and procedures. Filtration addresses particles in cooking oil; it does not replace cleaning fryer surfaces. Follow the site’s oil-management procedure and the fryer manufacturer’s guidance, and record these tasks separately so staff do not mistake one for another.
A repeatable check-and-record routine gives the next shift a clear picture of the fryer’s condition and any outstanding maintenance. It also helps identify when the cleaning schedule needs adjusting. For commercial teams reviewing how to clean commercial deep fat fryers, reliable records turn post-clean inspection into an ongoing control, not a one-off glance.
Support your wider kitchen cleaning routine with professional catering cleaning supplies, selecting each product for its stated use and intended surface.
Choose fryer-cleaning supplies and set up a dependable kitchen routine
The right cleaning product is one whose stated use matches both the fryer and the task. Do not choose a chemical based on general degreasing claims alone. A fryer interior, an external panel and nearby work surfaces can have different material and cleaning requirements. Treat product selection as part of equipment control, not as a shortcut based on what is already in the cleaning cupboard.
How to assess a cleaning product for fryer use
Before use, compare the label with the fryer manual and confirm that the product is intended for the specific surface and cleaning method. For a food-contact surface, check the label’s directions for that application. Follow stated dilution, contact time, rinsing and PPE requirements exactly. Use the safety information and workplace procedures to guide handling, storage and staff instructions.
- Fryer compatibility: Check that the product and method are permitted for the fryer model and its materials.
- Intended surface: Distinguish interior food-contact surfaces from the casing, controls and surrounding worktops.
- Label directions: Follow any stated dilution, application, contact-time and rinsing instructions. Do not improvise a concentration or use.
- Protection and handling: Check required PPE, hazard information, storage directions and relevant site procedures before staff begin.
Fryer-interior products and general kitchen degreasers are not automatically interchangeable. A general degreaser may be intended for hard surfaces rather than a fryer’s food-contact interior. Unless its label and the equipment instructions support that use, do not apply it inside the fryer. Likewise, do not assume a product is suitable for a boil-out or heated process simply because it removes grease elsewhere.
Make fryer cleaning repeatable across shifts
Keep the approved method, equipment instructions, product label and relevant safety information accessible to the staff responsible for cleaning. Set out who completes the task, who signs it off and how staff report persistent residue, damaged surfaces or a suspected equipment fault. Clear handover notes help the next shift understand whether the fryer is ready for service or needs attention.
Use the cleaning record to capture completion and relevant observations, then review it alongside the kitchen’s schedule and the fryer’s condition. If the same residue or issue keeps appearing, escalate it through the site’s maintenance process rather than changing the chemical or method without approval. This gives staff a consistent reference point while leaving room to adjust the routine in line with use, manufacturer advice and site procedures.
Pro Clean Supply is a UK-based online retailer of professional cleaning supplies, including catering and hospitality products. Browse professional cleaning supplies for commercial kitchens, and choose products according to their stated use. When standardising how to clean commercial deep fat fryers, matching product instructions to the equipment and task is essential.
Make your fryer-cleaning routine work shift after shift
Turn the cleaning method into a practical standard your team can follow. Keep the approved instructions accessible, make responsibilities clear and use inspection records to spot recurring issues. This gives staff a consistent reference point as equipment use and kitchen needs change.
Knowing how to clean commercial deep fat fryers is only part of the process. Make sure the products selected for each task match the equipment, surface and label directions. Do not treat a general kitchen degreaser as suitable for a fryer interior unless its stated use and the fryer instructions support that application.
Pro Clean Supply offers professional cleaning supplies, including products for catering and hospitality. Its concentrated cleaning supplies are available for business and home users. Browse the range for wider kitchen cleaning needs, choosing products only for their stated applications.
Browse Pro Clean Supply’s professional cleaning supplies and take the next step towards a dependable, equipment-conscious cleaning routine. With clear instructions and consistent checks, your team can keep the process organised and ready for service.
Frequently Asked Questions
How often should a commercial deep fat fryer be cleaned?
There is no single cleaning interval that suits every fryer. Base the schedule on service levels, visible soil, manufacturer guidance and your kitchen’s procedures. A fryer used for crumb-coated foods may need more frequent attention than one handling foods that shed fewer particles. Record completed cleans and note how quickly deposits return. If residue builds up sooner than expected, review the routine and equipment guidance.
Can you clean a commercial fryer without draining the oil?
Do not assume oil can stay in place during an interior clean or boil-out. The approved method may require you to drain it first, using the fryer’s specified procedure and suitable containers. Never add water or cleaning solution to hot oil. Before starting, follow the isolation and cooling instructions, and make sure staff know where the oil is to be collected and how it must be handled under site procedures.
Can you use oven cleaner to clean a commercial deep fat fryer?
Use oven cleaner only if its label and the fryer instructions support that specific application. Products differ, and an oven cleaner intended for one surface may not suit fryer materials or food-contact areas. When deciding how to clean commercial deep fat fryers, check the intended use, required PPE, dilution, contact time and rinsing directions before application. Do not use the product if the instructions do not permit the task.
What happens if water gets into hot fryer oil?
Water can rapidly turn to steam on contact with hot oil, causing violent splashing and potentially severe burns or a fire hazard. Keep water and cleaning solutions away from hot oil. If water enters the oil, keep staff clear and follow the site emergency procedure rather than trying to continue cleaning or cooking. Do not restart or resume work until the area and equipment have been made safe under workplace procedures.
Can washing-up liquid be used for a commercial fryer boil-out?
Do not use washing-up liquid for a commercial boil-out unless both the fryer instructions and product label support that use. A household product may not be intended for the fryer’s materials, cleaning process or food-contact surfaces. Check the directions before adding any product or water to the fryer. If the proposed use is not stated as suitable, select a product and cleaning method specifically intended for the equipment and task.
How should used fryer oil be disposed of?
Never pour used cooking oil into a sink, drain or onto the ground. Collect it in a suitable, secure container and follow your business’s waste-management arrangements and applicable local requirements. Keep oil separate from water and cleaning liquids, and make sure staff know the collection procedure before draining a fryer. If a spill occurs, use the workplace incident process and prevent people from entering the affected area until it is safe.
Should fryer oil be filtered as well as changed?
Filtration and oil replacement are separate oil-management tasks. Filtration can remove food particles, while the decision to replace oil should follow the fryer and oil supplier’s guidance and site procedures. Do not rely on colour alone to judge its condition. Record filtration and oil changes separately from equipment cleaning, so staff can see which tasks have been completed and do not treat filtered oil as a substitute for cleaning the fryer.